
Pancakes, Pancakes! Raise your hand if you love pancakes!

Ok, so I don’t know if I made up pancake pie or if it existed already out there on the vast inter-webs, but darn it I thought it would be so tasty and easy that I couldn’t resist experimenting with what I had left in the fridge this Memorial Day weekend.
I had the perfect combination of red and blue berries in the freezer (because it’s patriotic!), as well as just the right amount of ingredients to make pancake batter from scratch, and a clean pie dish, so it was just meant to be!

So, for this Memorial Day breakfast, or any time really (dessert maybe?), this pancake pie is the ideal quick meal for any busy body to make and share with the family. Plus, pancakes = family. Pancakes = America. Pancakes = FREEDOM! Ok maybe I’m being slightly overdramatic here 😉

But for reals, I literally cannot stress how easy this is to make. All you do is mix, pour, bake, and eat. Bon Appetite!

Time commitment: 60 minutes
You will need:
Medium mixing bowl
Fork or whisk
One 9″ pie dish
Flour sifter
Pastry brush
Cookie sheet
Ingredients:
1/4 cup blueberries
1/4 cup raspberries
1 1/2 cups flour
3 1/2 teaspoons baking powder
1/2 teaspoon salt
1 Tablespoon sugar
1 cup milk or almond milk
1/4 cup heavy whipping cream
1 egg
3 Tablespoons melted butter
1/4 teaspoon of vanilla or almond extract
Dash of cinnamon
OPTIONAL:
Melted butter for brushing
Powdered sugar for dusting
Maple Syrup for serving
Extra fruit for garnishing

Directions:
Preheat oven to 350º F
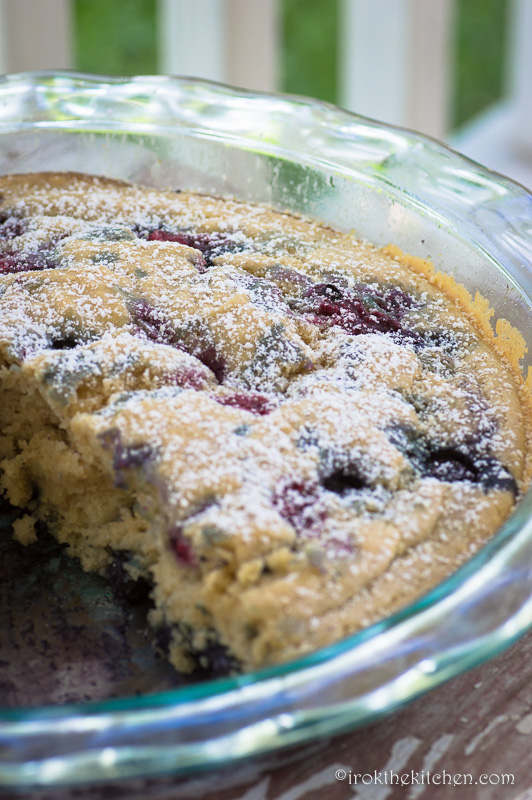
*Begin by pouring the blueberries on the bottom of a clean pie dish, and spread them out evenly.

*Using your sifter, pour the dry ingredients (flour, powder, salt, sugar) through and sift into your bowl. Then give them a quick whisk until combined.
*Make a well in the center of the dry ingredients and add the milk, cream, egg, melted butter, and extract. Mix until combined.
*Pour the batter over the berries in the pie dish until covered.

*Drop pieces of raspberry into the batter and sprinkle with cinnamon.

*Place in oven on a cookie sheet (in case of spillage) and bake for 45 minutes.
*At the 45 minute mark, check the pie by jiggling the cookie sheet- the center should not be moving. You can also test with a toothpick in the center to see if it comes out clean.
*Using your pastry brush, brush the top of the pie with melted butter and bake for another 5 minutes. Bake time total should be 50 -55 minutes. The top will brown slightly but not much, and likewise the pie should not spill out of the pie dish.
Do not worry if the bottom turns out to look like a black mess, it comes out quite clean from the dish, if you have the right serving spatula that is!

*Cool for about 15 minutes on a cooling rack and serve warm.
Yields 8-10 servings depending on size of pie slice.

PS: This is the first time I’ve experimented with a pour shot! Not too shabby, but knowing I did this by just holding the camera in one hand, and pouring pure maple syrup with the other, I am quite happy how this shot turned out. Next time— actual tripod, remote shutter, and a fast shutter speed with a proper background should help the syrup look picture perfect! (I hope)


OH! And they had those ADORABLE little syrup servers like in the old fashioned diners, for sale at Hy Vee. I HAD to get one! How could I pass it up? I mean seriously…
All in all, it kept pretty well in a seran-wrapped dish for a few days. I enjoyed it re-warmed for breakfast pretty much all weekend. So if you have a brunch with a party of 4-8, this would be perfect to serve up fresh, or could even be prepped the night before 🙂

Enjoy! And happy Memorial Day. Remember those who served.

-K
